Memory and Notemaking
Note-making is active writing. Students are given formats or frames which organize thinking and hence notemaking.
Learning More Quickly and Forgetting More Slowly
Regardless of what social studies course we teach, World History, World Cultures, US History, Geography, or any of the social sciences;
Regardless of what academic level we teach, AP, honors, college prep, basic, special education or bilingual/esl:
Regardless of whether we teach live on line or in-person;
Regardless of how we teach, direct instruction “listen to me and do as I say”, cooperative inquiry groups of independent digital assignments;
All teachers need and want their students to achieve more and forget less. The key to this process is using four academic literacy skills.
A. Gather and organize information from print, visual, and data sources
B. Process this information through thinking and reasoning
C. Store, retain, and rehearse the information through memory
D. Produce thought in writing, speech or through the creative actions of drama, art, music, and movement.
Following are three ideas that will assist students in Memory skills. But before we begin examining these activities let’s consider 3 Nos. There will be NO “taking” notes. We will “make” thoughts or notes. Use NO notebooks. We will give students or show them how to make special notemaking paper. Finally, save money. Buy NO notebooks!
Illustration #1 is used for reading assignments. Create and distribute this illustration to students using standard size paper. If available use different colors for different marking periods. Colors enhance memory. Let’s examine #1. Top Center the Y=yesterday, what did we study yesterday? Note it. The T is for Today. Note today’s topic. Notes are made on the numbered lines. Key vocabulary, people, events, dates, ideas etc. are noted. Critical questions are copied or created.
On the right side are 3-line graphs: the topic, event, cause, effect triangle, the Venn Diagram for comparison/contrast within a given topic and a single chronology date line to capture key dates.
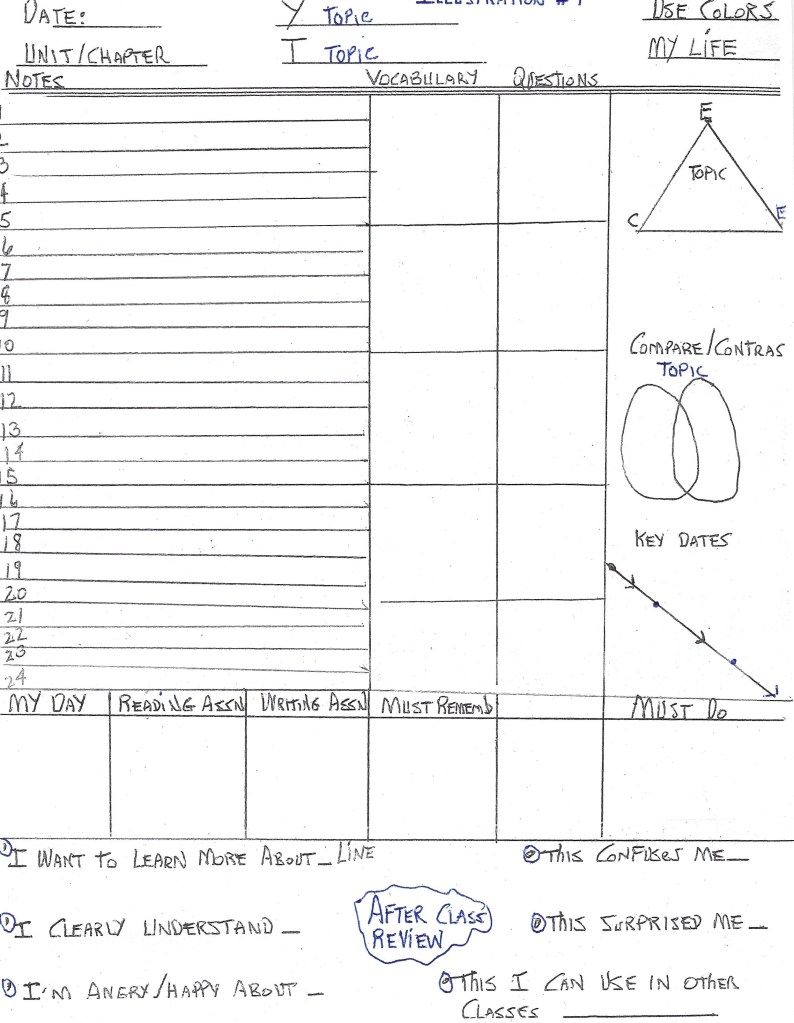
On the bottom of the notemaking paper is a review section. Note the KEY on the lower left side. What is the key or unlocking ideas of the reading/research assignment? Note them below the KEY. What does the student NEED to know and DO? Write it down! What am I curious about? What is the next assignment?
Towards the bottom of the page are review end of class note boxes. The most important is the MY DAY. In this box note the weather, clothing worn, food eaten, or anything special in the student’s life that day. Personal memory must be linked tri academic study. The other boxes are self-evident. What is my next reading/writing assignment? What must I remember from this class and what Must I do for the class? The open space if for ideas from the teacher or student.
The notemaking page ends with a review section completed at home and turned in to the teacher. These reactions give feedback information to the teacher and can guide future classes.
Finally, look at the upper right of the illustration and find the words Use Colors. Ask students at the start of the year to buy a 4-color pen. Use it in class or for review. Here’s how it works.
Original notes are done in black. Green is used in review. Green=growth. Red is used to locate confusion. Red=danger. Blue is for clarity or I understand. Blue-clear in my mind as in a blue sky. Colors focus study and enhance memory. Use them.
This technique uses eight one-half by fourteen size paper. But it can be done on standard paper. It is used for assigned readings or research. Illustration #1 is used in an active class learning situation. The notemaking paper has a Text Reading Chart with vocabulary extensions to the left. The text reading chart has an area to note page locations. The illustration uses a visual flow chart to organize information and question “stems” to note questions and answers found in the reading.

Illustration #2
On the bottom of the notemaking paper is a review section. Note the KEY on the lower left side. What is the key or unlocking ideas of the reading/research assignment? Note them below the KEY. What does the student NEED to know and DO? Write it down! What am I curious about? What is the next assignment?
As you examine these 2 illustrations ask ourselves these questions. What do our student notebooks now look like? What is their current value? Can we try one of these illustrations in one of our classes and see how they work toward achieving our goal: learning more quickly and forgetting more slowly.
Now, lets’ go to another activity used in reading articles. Not all reading is text or document reading. Reading occurs in different formats. Oh, yes! Those of us who use digital texts and not books are still using texts. The word “text” is from Latin meaning “threads”. When we use digital devices, they are still using text which live as pixels behind the screen.
Illustration #3 is used by students when reading a NEWS ARTICLE or an essay from a periodical. The notemaking elements are self-evident. Remember ask students to use the 4 colors and somewhere on the paper note something about an event in their life, the food they just ate, the clothing they are wearing, or even how they feel. Private memory and academic memory link and help the academic emerge when students take exams, write, or speak.
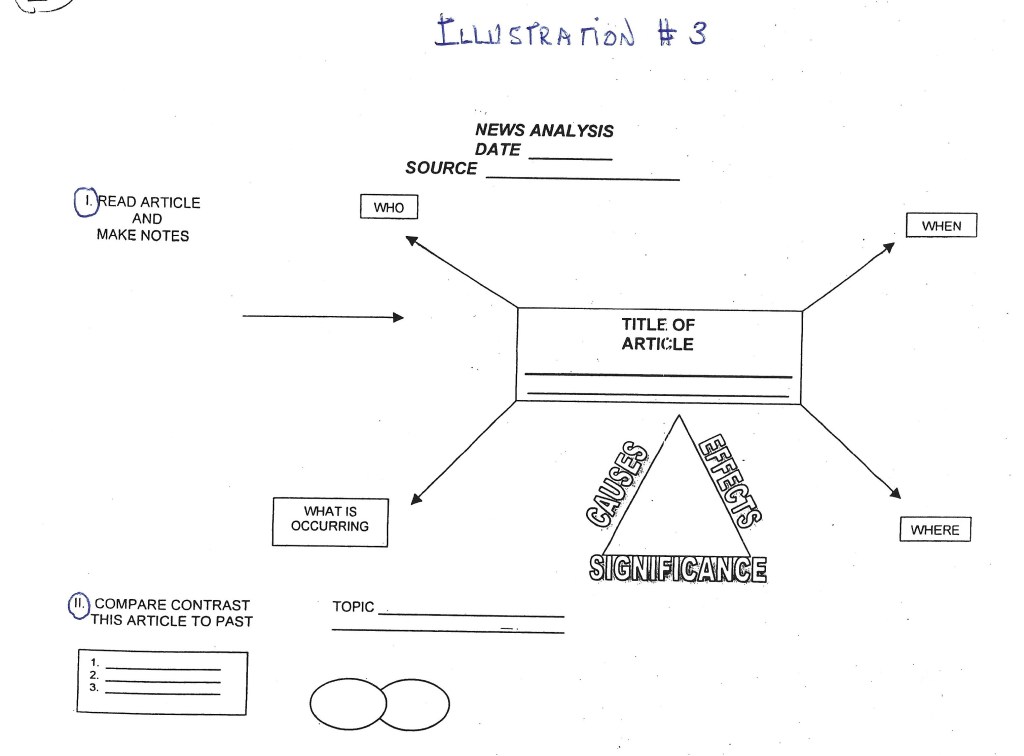
Finally, use the notemaking paper in phased practice reviews after classes and require that they turn in samples of their notemaking paper with exams. Give the finished notes credit. You can even ask them to create their own exams or add to yours using their notes. Reward successful practice as well as content mastery.
Creating Memory Using Visual Palates
Academic Literacy has 4 elements: gathering and organizing information, thinking/reasoning, building useable memory, and producing thought. Visual palates help build visual memory. They create a video tape or CD of a particular content topic.
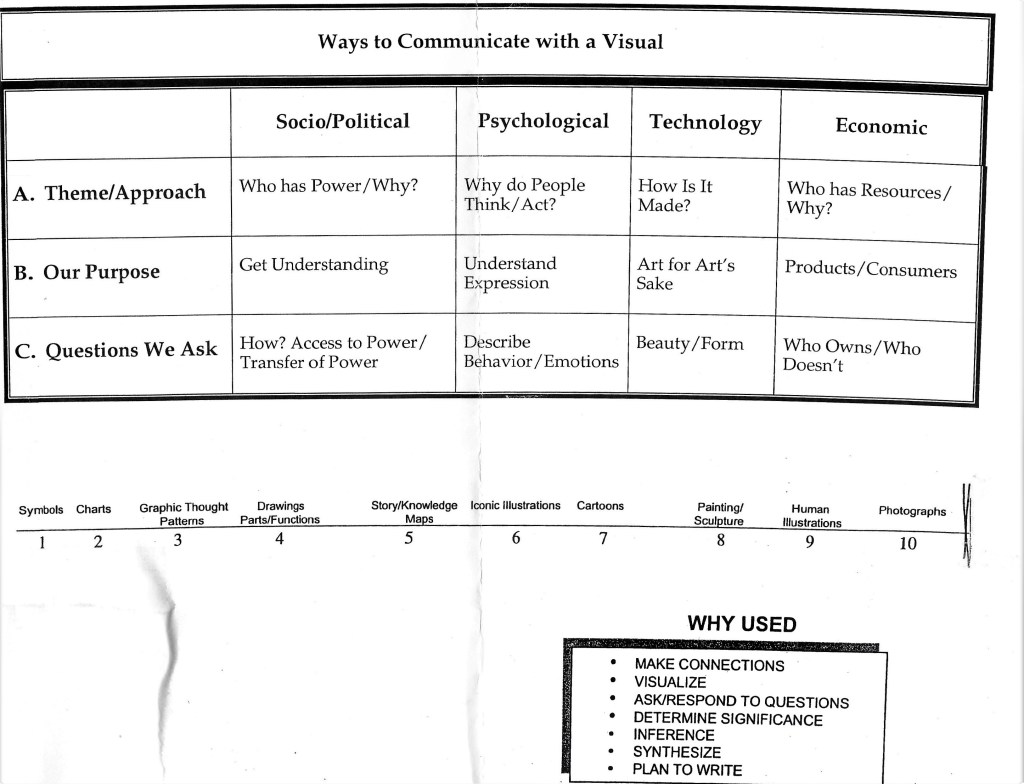
Illustration #1 describes the range of visual palates and their functions. At the bottom of the page there are 10 types on a spectrum from abstract symbols such as an arrow to realistic photographs. Visuals act a metaphor for both content information and a particular dominant thinking skill used when students encounter the content. Teachers locate and reproduce the visual palate on standard size 8 ½ x 11 paper although they can also be used on larger paper. Each student is given a visual palate. They are used in class, for assignments, or as test items.
American History Thinking Skills – Notemaking and Visuals: Tools for Improved Achievement
Illustration #2 lists the types of thinking skills used in our courses. Several may occur in a single class or assignment but normally one or two will dominate learning.
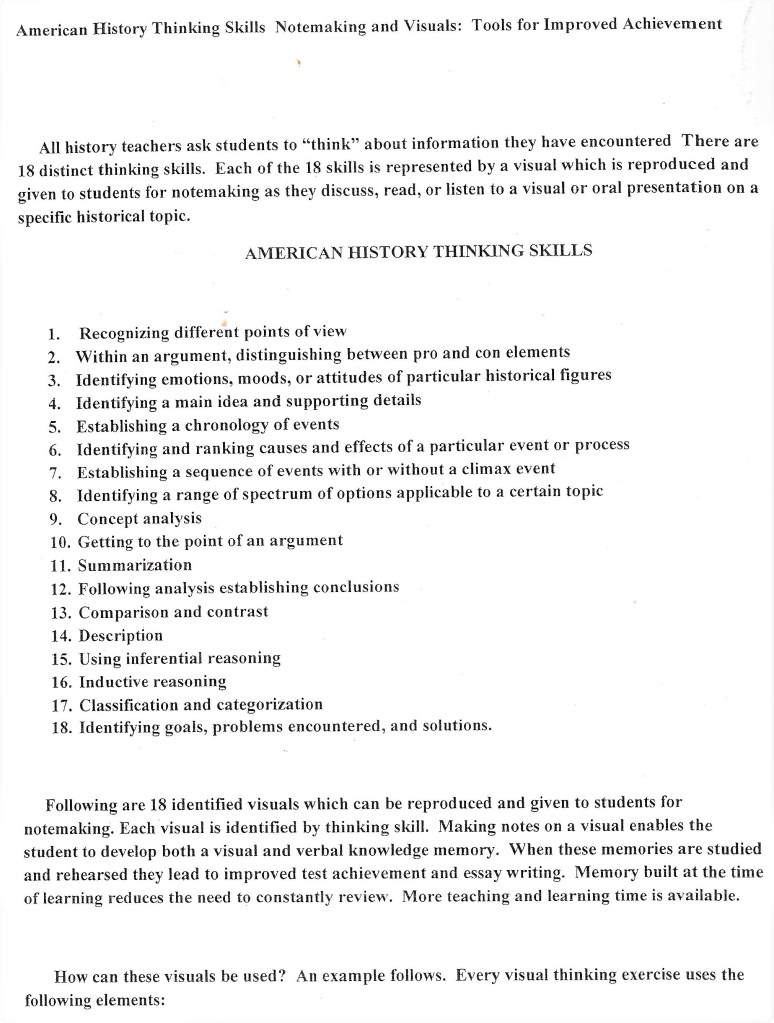
Illustration #3 is our first visual palate. It is line drawing of a tree embedded in soil. The major content focus is preprinted on the trunk of the tree. As students listen, read, watch videos they will make notes or begin to PAINT the visual palate. Let’s examine the 7 sections in the visual.
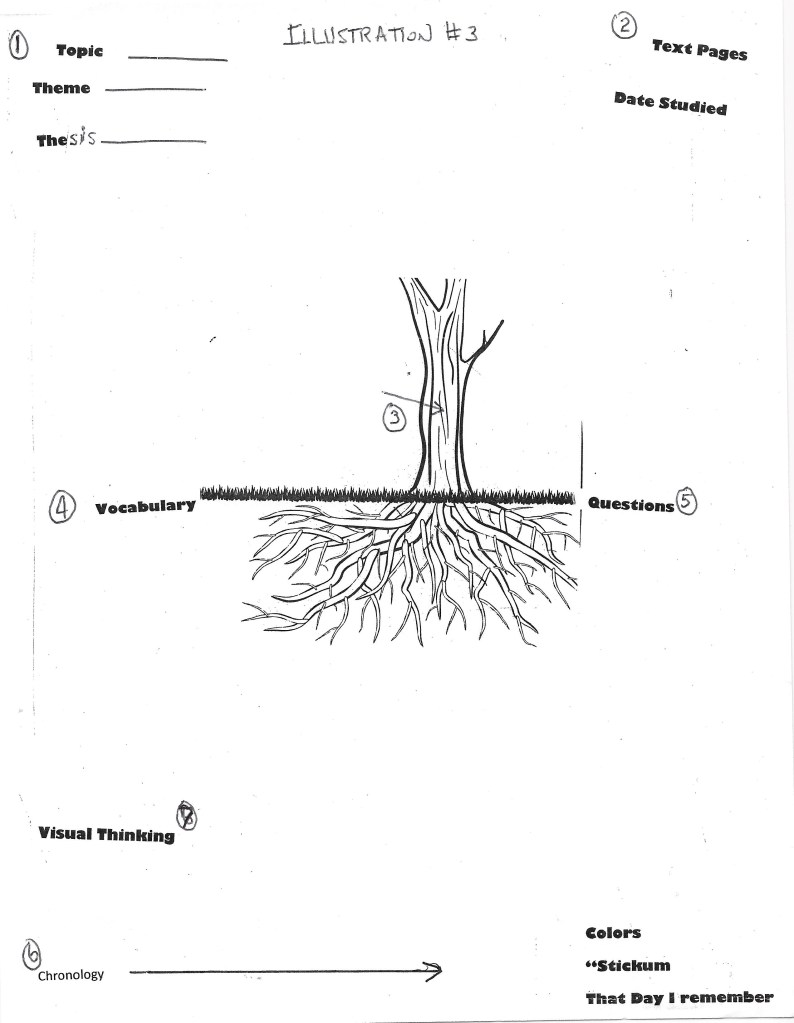
- Upper left corner there are 3 Ts. Students make notes on each. The first is the TOPIC, the facts of who/where/when/what the second is the THEME or thread that runs through the entire learning topic. The third is the THESIS or argument that drives our inquiry. This is the triple T
2. In the upper right are sections that link the visual to text pages and the date when learning first occurred.
3. The trunk depicts the content topic. Below the trunk are the roots or CAUSES of the topic. Extending out from the trunk are branches which become the EFFECTS of the topical events. Students make their notes on the many roots and branches. Some roots and branches are primary and some are secondary or minor.
4. Key vocabulary is isolated to the left of the roots and key questions are noted at (5) to the right of the roots.
5. At the very bottom of the palate is a time or chronology line. Students note critical dates.
6. This visual thinking area might have a Venn Diagram for compare and contrast or a star for an important person.
In the extreme right corner are 3 memory builders. Colors, use a 4-color pen on a palate. Black is for critical notes, red is for confusing ideas and hence dangerous, green is for notes we make when studying and represents growth, and blue is for ideas we clearly see like a sky blue. We can also attach postal notes or stickums to the paper. They focus the eyes. Finally, we must note something that personally occurred to us on that day. It might be the weather, the food we ate, the clothing we have, the shoes we wear, or how we feel. Connect the personal to the academic learning. The personal will rehearse or ignite the academic when we study or when we want to write or speak.
All visual palates have the same elements. Illustration #4 shows a clock with attached sticks of dynamite. This visual is used for revolution, American, French, Civil War, Nazi Germany, USSR 1917, Mao’s China, Castro in Cuba etc. As students learn they paint the palate with their 4-color pen. The dynamite=causes. The clock hours=events.
So, what to do? If we like the visual palate idea try it with only one class. When? try the last class of the day. Do something different. If it works the day ends well. If it does not get out of school, turn on the radio, and go home. If we use new ideas early in a day and they do not work they often leave an aftertaste in the mind and air since students will tell one another that the teacher is doing something weird today.
Limit creativity to the margins of our daily school life. We are already doing a good job. We are not working from a deficit. Visual palates can be used in any course, with any student type, and within any instructional/learning study. They can be used in class, for assignments, or on tests. We need to show them how to use them, permit them to use them in small groups, and then ask students to practice independently. They have one goal increase faster learning and slow the relentless decay of memory.
When we announce an exam and want students to study their notes what do these notes now look like? If they have created visual palates, they use them. They are videos and aural recordings of their learning.
The Knowledge Map. (KM)
The KM is a specially designed 8 ½ X 14 paper used when a class has a long unit or chapter that might go for 10 or even 15 classes. The content might be a long chronology or complex series of events. KMs may be used in any subject and are especially useful learning and memory tools in AP classes which are both fast-paced and intensive.
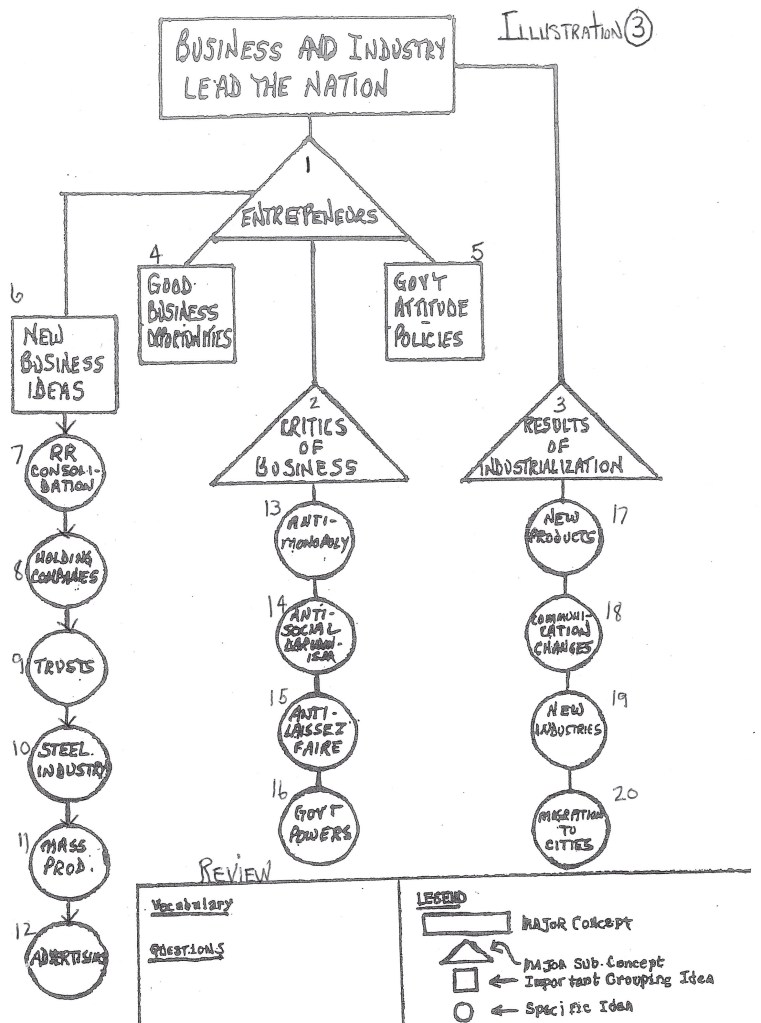
This is how a KM is created. Get legal-size paper. Step I-Identify the content topics you want students to investigate. The topics might be people, events, or ideas. Our example shows a teacher KM with 20 topics. Step 2-arrange the topics in a flow chart and number each one. Step 3-decide a flow chart type. There are 3.
A, The “completed” or fully clothed chart showing names of all topics.
B. The “naked” or incomplete flow chart showing empty chart spaces that students will fill in during the unit.
C. The “checker board” chart in which random spaces are filled in by the teacher and others are left empty for later student work.
Give the one you choose to students at the start of the unit or chapter. Tell them they will be used throughout the unit and turned in with all quizzes or exams. They are given credit for completed KMs.
Illustrations 1-2-3 show the topic list, a naked KM, and a completed KM.
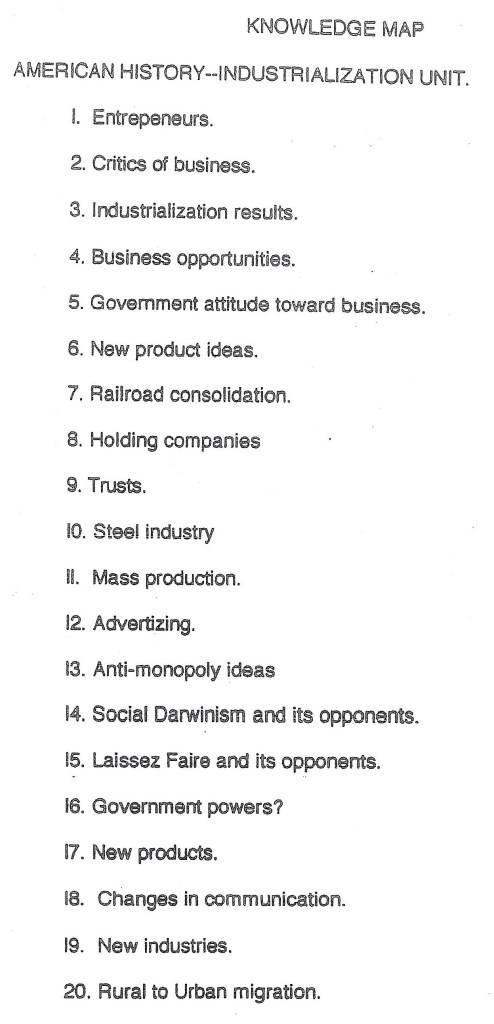
Illustration #2 – A ‘Naked” Knowledge Map

KMs are used in 3 class learning times, these are at the start of a class to review and preview, during a class as a “time out” or integration moment, or at the end of a class as a “wrap it up” final one or two minutes. They can also be used for assignment notemaking or test preparation. They replace notes in a notebook. They integrate many learning days and different forms of learning.
Following are 13 tips for using KMs. Pick a few and try them.
- If you can, create the KM on colored paper. It is harder to lose. Make friends with art teachers. They may have a ream.
- Organize the class into teams of 3 or 4. If a student is absent, they can share work on their phones or in class.
- On each chart area note the date the topic was first studied.
- On each chart box note the page number in the text where this information is located.
- To the left of each box note a question (Q) about the topic. The ? may come from the teacher or is student created. Interact with the topic!
- To the right of the topic note an associated vocabulary word or date (V) Again, interact and extend learning.
- Use a 4-colored pen. Black for original notes. Green for review or growth notes. Red for confusion and danger. Blue for “I understand this.” Study the red and green.
- Create a chronology or time line at the bottom of the KM.
- Notes which topics are homework or project assignments and their due dates,
- Get some post-it “stickums” of different colors and attach them to different chart topics you want to emphasize.
- Sketch visual graphics on the chart such as a STAR for an important person or a VENN diagram for compare/contrast thinking.
- Occasionally make notes about your personal life on the chart: the weather, food you ate, clothing you wear, videos you saw etc. Merge the personal with the academic.
- Anywhere on the chart write old exam questions on the chart.
There are five learning principles embedded in KMs
- Spaced time-interval review.
- Self-inquiry
- Short quizzes or tests review and response
- Using colors
- Merging personal memory with academic memory
Try a KM in one course in one class. Determine if that class has a greater grasp of complex content when compared to another class. Consider using the KM the last of the day. Often student athletes or club members may be absent for special events. Their team members can keep them up to date until they return to class.
One teacher uses the KM on a test review day. The teacher creates a completed KM and then cuts it into many pieces and puts them into an envelope which is given to a team. The team opens the envelop and has to reconstruct the KM and justify their thinking.
Learning more quickly and forgetting more slowly is our goal. The KM is one tool we can use. A middle school might use a smaller KM with 10 topics. A high school class might have 20. A complex AP unit might have 30. KMs are used in any teaching or learning style, in a room with desks or tables or lined with individual computers. The KM integrates content, time, and a variety of teaching materials into a single memory device.
